Unleash Your Inner Mad Scientist: Crafting Delightful Halloween Oreo Spiders
As the leaves turn crisp and a chill descends upon the air, the countdown to Halloween begins! It's a season synonymous with spooky decorations, creative costumes, and, of course, delightfully eerie treats. Among the pantheon of easy-to-make, kid-friendly Halloween snacks, halloween oreo spiders stand out as a perennial favorite. These creepy-crawly confections are not only incredibly simple to assemble but also offer a perfect blend of chocolatey goodness and playful fright. Whether you're hosting a ghoulish gathering, preparing for a school party, or simply looking for a fun activity to do with the kids, mastering the art of the Halloween Oreo spider is an absolute must.
Imagine the gleam in children's eyes (and adults' too!) as they encounter a plate full of these eight-legged chocolate delights. They're a fantastic no-bake option that requires minimal ingredients and even less fuss, making them an ideal project for busy parents or first-time bakers. Beyond their ease, Halloween Oreo spiders are incredibly versatile, allowing for endless creative variations to match any spooky theme. Let's dive into how you can bring these adorable yet slightly creepy creatures to life, ensuring your Halloween festivities are nothing short of spectacular.
Why Halloween Oreo Spiders Are a Must-Make Treat
The allure of Halloween Oreo spiders goes far beyond their delightful taste. They embody everything we love about Halloween treats: they're fun, they're thematic, and they're undeniably delicious. Here’s why these spooky snacks should be at the top of your Halloween menu:
- Incredibly Easy to Make: Forget complicated recipes and ovens! These are truly a no-bake wonder. Most of the process involves simple assembly, perfect for all skill levels.
- Kid-Friendly Fun: Little hands love to help. From unwrapping Oreos to sticking on candy eyes, making Halloween Oreo spiders is an excellent interactive activity that fosters creativity and provides a sense of accomplishment for children.
- Budget-Friendly Ingredients: You only need a few core items, most of which are readily available at any grocery store. Oreos, pretzel sticks, and candy eyes are the main stars.
- Visually Striking: Despite their simplicity, these spiders have a significant visual impact. A platter of these treats instantly elevates your Halloween spread, making them perfect for parties and gatherings.
- Customizable: While the basic concept is simple, there's ample room for creativity. You can experiment with different types of Oreos, various leg materials, and a range of edible decorations.
They are the quintessential treat that balances spooky charm with effortless preparation, ensuring you spend less time in the kitchen and more time enjoying the season's festivities.
Essential Ingredients & Tools for Spooktacular Spiders
Crafting your fleet of Halloween Oreo spiders doesn't require a trip to a specialty store or an extensive pantry. The beauty lies in their simplicity. Here's what you'll need to gather:
Core Ingredients:
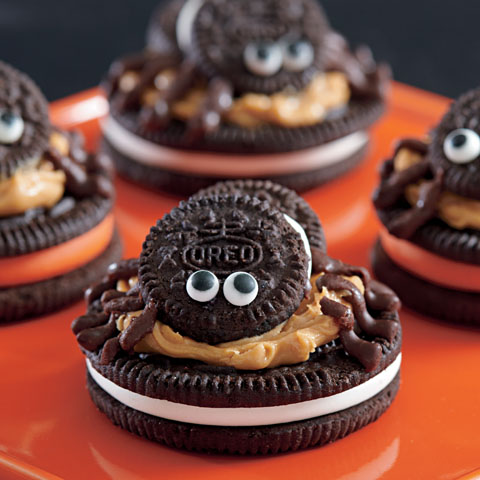
- Oreo Cookies: The classic chocolate sandwich cookie is the foundation. You can use any flavor you like – original, double-stuffed for a plumper body, or even seasonal varieties like pumpkin spice for an extra festive twist.
- Pretzel Sticks: These will form the eight delicate (or not-so-delicate!) legs of your spiders. Thin pretzel sticks work best for a more realistic spider leg appearance. You can also use black licorice strings or chocolate-covered pretzels for a different look and taste.
- Candy Eyes: Edible googly eyes are what truly bring these creatures to life! You can find these in various sizes at most craft stores or baking aisles. Small ones work great for a subtle look, while larger ones add a comical touch.
- "Glue" for Eyes and Legs: This is where melted chocolate or frosting comes in. A small amount of melted chocolate chips (dark, milk, or white) or even pre-made black or white icing in a tube will work perfectly to adhere the eyes and secure the legs.
Helpful Tools:
- Parchment Paper or Wax Paper: Essential for a non-stick surface to place your finished spiders as they set.
- Microwave-Safe Bowl or Double Boiler: For melting chocolate if you're using it as your "glue."
- Small Spoon or Toothpick: Ideal for dabbing small amounts of melted chocolate or frosting for the eyes.
- Zip-top Bag (optional): If using melted chocolate for piping, a small zip-top bag with the corner snipped off can act as a makeshift piping bag.
Having these items ready before you begin will ensure a smooth and enjoyable spider-making experience.
Step-by-Step Guide to Crafting Your Creepy-Crawly Delights
Let's get down to the fun part! Follow these simple steps to create your batch of adorable Halloween Oreo spiders.
1. Preparing Your Oreo Base
Gently twist apart each Oreo cookie, separating the two chocolate wafers from the cream filling. Take care not to break the wafers. You'll want to keep the cream filling intact on one side – this will be the "belly" of your spider where you'll insert the legs. If you're using double-stuffed Oreos, this step might be a little trickier, but the extra cream provides a firmer base for the legs.
2. Attaching the Legs
Carefully break your pretzel sticks in half. For each spider, you'll need eight "legs," so four full pretzel sticks will make one spider. Gently insert four pretzel halves into the cream filling on one side of the Oreo, arranging them to look like spider legs. Repeat this on the opposite side with four more pretzel halves, ensuring they are evenly spaced. The cream filling acts as a natural adhesive, holding the legs in place. Some people prefer to melt a little chocolate and dip the end of the pretzel in it before inserting for extra stability, especially if the cream is not very firm.
3. Reassembling and Adding the Eyes
Once all eight legs are securely in place, carefully press the plain chocolate wafer (the one without cream) back onto the side with the cream and legs. You might need to apply gentle pressure to ensure it's reattached without breaking the pretzels. Now, melt your chocolate or prepare your frosting. Using a toothpick or a small spoon, dab two small dots of melted chocolate/frosting on the top of each reassembled Oreo. Immediately place two candy eyes onto these dots. Hold for a few seconds to ensure they stick. You can also add a third dot for a mouth or draw tiny fangs with a food-safe marker for an extra touch of spooky detail.
Place your finished Halloween Oreo spiders on a sheet of parchment paper and let them sit for about 10-15 minutes to allow the chocolate or frosting to set completely, ensuring the eyes stay put.
Creative Variations & Tips for Taking Your Spiders to the Next Level
While the classic Halloween Oreo spiders are fantastic, there are endless ways to customize them and make them uniquely yours:
- Chocolate Dipped Legs: For extra indulgence and a sturdier leg, dip your pretzel sticks in melted chocolate (white, milk, or dark) and let them set before inserting them into the Oreos. You can even drizzle contrasting chocolate on top for a webbed effect.
- Different Leg Materials: Instead of pretzels, try black licorice laces for a chewier leg, or thin strips of fruit leather.
- Spiderweb Base: Drizzle melted white chocolate in a web pattern on a serving plate before arranging your spiders for a truly elaborate display.
- Oreo Flavor Explorations: Experiment with different Oreo flavors beyond the original. Golden Oreos create a unique look, while mint or peanut butter Oreos add flavor variety.
- Monster Spiders: Use colorful candy melts for your "glue" and candy eyes, creating multi-colored, whimsical spiders rather than strictly black and creepy. You can find more monster mash-up ideas by checking out halloween oreo spiders - Article 3.
- Sugar Sparkle: Before the chocolate glue for the eyes sets, sprinkle a little edible glitter or colored sugar over the top of the Oreo for a dazzling effect.
Don't be afraid to get creative! Half the fun of making these treats is personalizing them.
Serving Suggestions & Storage
Once your army of Halloween Oreo spiders is complete, it's time to showcase them! They make a fantastic addition to any Halloween spread:
- Themed Platter: Arrange them on a platter with other spooky treats like gummy worms, candy corn, and miniature pumpkins.
- Cupcake Toppers: Carefully place a spider on top of a frosted cupcake for an instant spooky upgrade.
- Individual Treats: Package them individually in clear treat bags tied with orange or black ribbons for party favors or trick-or-treat handouts.
- Dessert Table Centerpiece: Create a "spider's lair" by arranging them around a larger, themed cake or bowl of punch.
For storage, keep your Halloween Oreo spiders in an airtight container at room temperature for up to 3-5 days. If you've used melted chocolate for dipping or extensive decoration, they might last a bit longer if kept cool. Avoid refrigeration if possible, as it can sometimes make the Oreos and pretzels a bit soggy, though if your climate is very warm, a short stint in the fridge might be necessary to set chocolate firmly.
Conclusion
Crafting Halloween Oreo spiders is a truly delightful and fuss-free way to embrace the spirit of the season. They are the epitome of simple elegance in the realm of spooky treats – easy to make, fun to decorate, and utterly delicious to devour. Whether you're a seasoned Halloween host or just looking for a simple activity with the kids, these charmingly creepy confections are guaranteed to bring smiles and screams of joy. So gather your ingredients, unleash your creativity, and prepare to enchant your guests with these irresistible, eight-legged chocolate marvels!
